

DIY Kit: Rainbow Crib
- May 6, 2021
- 1 min read

All kids love rainbows, and I love the subtle rainbow detail on the ends of this crib.. To purchase this DIY Kit, please click here. You can also order the assembled version (which includes a mattress) from the same link. Let's get started with assembly.

Your kit includes everything you see in the above picture.
-2 side panels
-2 rainbow ends
-base
You will need to supply the following items:
-craft glue
-220 grit sandpaper
-paint and/or stains in colors of your choice
-mattress (I have a tutorial about how to make dollhouse cushions)

If you plan to stain or leave the crib unfinished, use a fine grit sandpaper to sand away the burn marks on the front and back of each piece. If you plan to paint the crib, I recommend painting the pieces before assembly.


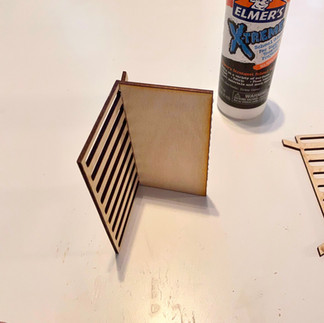


Apply a thin line of craft glue to the long edge of each side of the base (see first picture above). Attach the base to one of the side panels living up the base with bottom of the side panel above the legs (see second picture above). Attach the other side panel to the other side of the base (see third picture above).


Apply a thin line of glue to the bottom edges of the rainbow end (see first picture above). Attach the rainbow end to the crib, and repeat on the other side. Allow the glue to dry completely. Check out my tutorial for how to make a mattress.

You have a finished rainbow crib ready for your baby. Make sure to tag me on Instagram @mini.adventures.co to show me how you customized your rainbow crib.


Comments