

Bubble Chair
- Aug 9, 2022
- 2 min read

With a feisty 2yo at home who likes dollhouses, I'm always looking for cheap and easy DIY projects to use until she's ready for the nicer, more delicate items. I made this bubble chair for a couple of dollars, and I knew it wouldn't matter if Baylor broke the chair because it could be repaired quickly with a bit of super glue. Plus, I love the modern twist of these acrylic chairs with their fun shape.
Materials:
-plastic wine glass base
-clear plastic ornament
-X-Acto knife
-super glue


You only need 2 items to make the chair. You need the base of a plastic wine glass. You can see the size I used in the picture on the left. I got this pack from Party City for a few dollars, and I can use the rest of them for a party. Sounds like a good excuse to me. You also need a plastic ornament that breaks into 2 parts. The picture on the right shows the size I got from Hobby Lobby. You can make 2 chairs out of 1 ornament. You can also just use string to hang them from the holder for a cool swinging chair.


The first step is to cut the hanger off the ornament. This step is totally optional, but I like the cleaner look without the hanger. Use a sharp X-Acto knife to cut off the hanger. I have a knife that I can plug in so it's heated. This makes it a lot easier to cut off the hanger but be careful to not heat up the blade too much because then it'll melt the plastic ornament. You can see in the second picture that my knife was a little too hot so it melted the plastic just a bit.

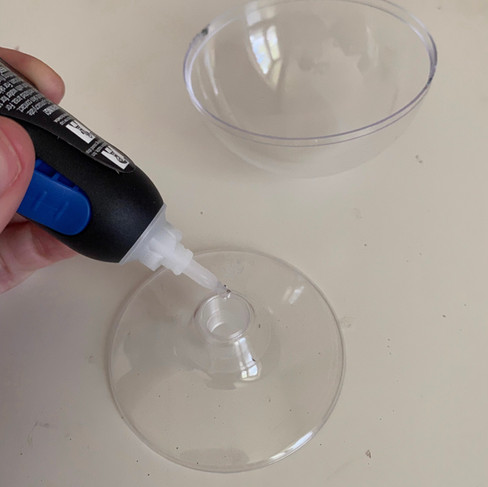


The second step is to glue the ornament to the base. Apply super glue (something that dries clear and will adhere to plastic) to the part of the base that will come into contact with the ornament. Place the ornament on the base in whatever angle you think is best. Try not to move it around on the glue because the super glue will leave behind a residue once it's dry. Hold the ornament in place for a minute while the glue sets.

That's it; just 2 steps! Probably my easiest tutorial ever. Decorate the chair with a sheepskin throw and a pillow and now you have a cozy nook for your dollhouse. It's time for Mouse to snuggle up and read a good book.

Tag me on Instagram @mini.adventures.co to share your bubble chairs.