

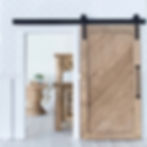
Sliding Door Tutorial
- Feb 4, 2020
- 5 min read

If you've seen my real house, you know I'm a big fan of farmhouse style, with lots of weathered wood, chippy paint, and neutrals. I love sliding barn doors, and I have 2 spots in my house where I'd like to hang them, but I've just never gotten around to it. My latest dollhouse, however, does have sliding doors. Go figure. For today's tutorial, I'm going to share how to make 2 different sliding doors and how to make the hardware for hanging the doors.

Materials:
All provided measurements are based on the size of my doorway and door so you might need to adjust if yours are different sizes.
-sliding door (I'll show you how to make the 2 I have in Step 2)
-handle for door (I'll show you 2 examples in Step 3)
-mounting hardware (I'll show you how in Step 4)


Step 1: Make a doorway
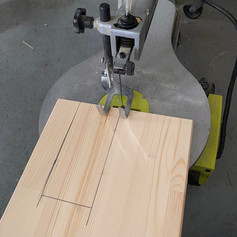
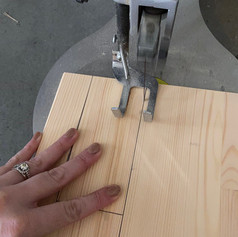
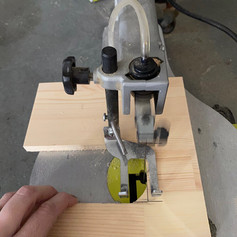
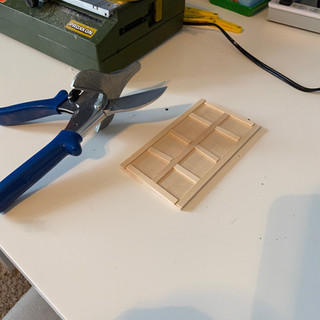
Most of you can probably skip this step because you're most likely working with an existing opening in your dollhouse. I've been working on the IKEA dollhouse to use for staging the products I sell and that dollhouse doesn't have any doorways so I needed to create one on the first floor room divider. I used a square to draw an opening that measures 2 3/4" x 5". I used my scroll saw to cut the opening. Finally, I used my miter cutters (perfect for cutting thin wood accurately; you can find mine here) to cut 1/4" x 1/16" strips to make moulding to go around the door. I glued on the moulding, let it dry, and then painted everything white.

Step 2: Make a sliding door
Now it's time to make the door. I'll give you 2 options here, but the possibilities are endless. First you need the base of the door. Based on my opening (2 3/4" x 5"), my door needed to measure 5 7/8" x 3 1/8" so it completely covers the opening and moulding when closed.
Let's go over the modern diagonal door first.
Materials:
-(1) 1/16" balsa wood sheet cut to 5 1/8" x 2 3/8"
-(2) 1/8" x 1/4" cut at 5 1/8" (I cut mine at a 45 degree angle to give it a cleaner look)
-(2) 1/8" x 1/4" cut at 2 3/8" (cut at 45 degrees)
-1/2" wood veneer edging (I use this for anything that requires wood strips like flooring or shiplap; you can find the kind I get here)


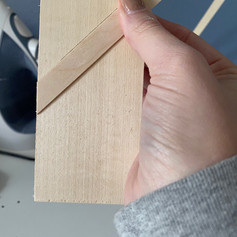

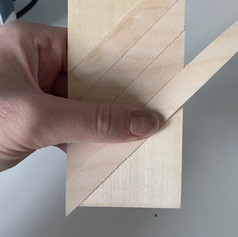

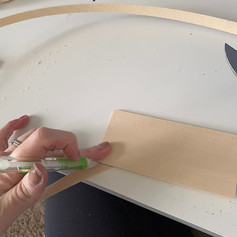

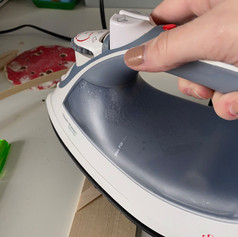

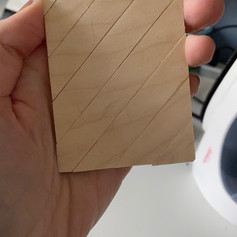


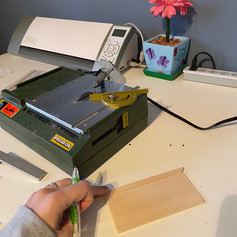


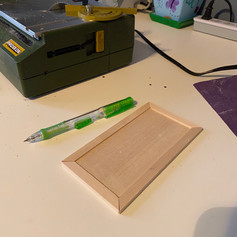

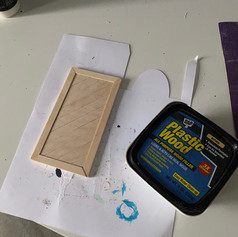


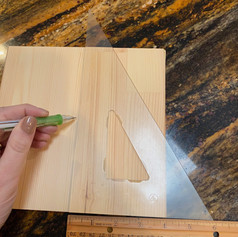
Cut your base (I used my mini table saw that you can find here). To make diagonal slats, you need to draw a line at 45 degrees (picture 1). You can use a square to do this or check out tutorials on how to draw a line at 45 degrees. Use your miter cutter to cut one end of the veneer edging at 45 degrees. Lay it on the base along your 45 degree line with the edge lying flush (picture 2). Use your hand to hold the veneer in place, turn it over, and mark the other end that needs to be cut with the pencil (pictures 3 & 4). Use your iron to attach the veneer, making sure it stays on the 45 degree line (picture 5). This first strip is important because, if you get this right, all the other pieces will be correct. If it messes up, the veneer an be reheated with the iron and repositioned. Keep attaching slats until the door is covered. If your cuts aren't perfect (picture 6), it's easy to sand the edges (picture 7) to make sure everything is flush for attaching the trim. Cut your trim pieces (I used my mini table saw to cut mitered edges for a cleaner look, but that isn't necessary (picture 8). Attach the trim pieces with glue (pictures 9 & 10). If your mitered edges have gaps like mine, use wood filler to fill in the gaps (picture 11). Now you have a finished door (picture 12) ready for paint or stain.
Now for the metal tile door.
Materials:
--(1) 1/16" balsa wood sheet cut to 5 7/8" x 3 1/8"
-embossed scrapbook paper (I got mine at Hobby Lobby)
-1/4" x 1/16" wood strips for trim


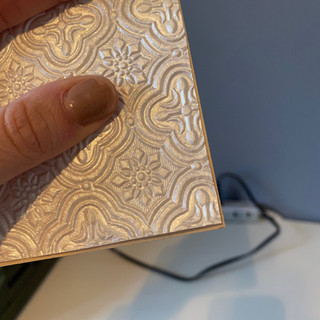

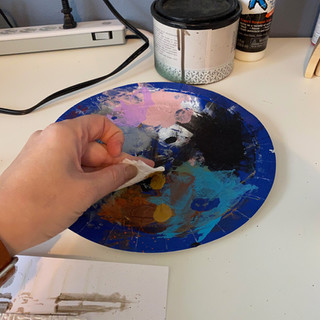


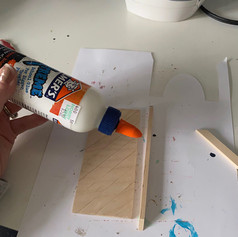
Cut your base and lay it down on the paper (picture 1). Use a pencil to draw an outline. When cutting the paper, cut inside the line so that there is a very slight gap between the paper and edge of the base (picture 2) so the paper won't be obvious in the final product. Glue the paper to the base and allow to dry. The paper is beautiful by itself, but I wanted the details highlighted with gold paint to give it more dimension. To do this, you just need a couple drops of gold paint and a paper towel. Get some paint on the paper towel and then dab it on something until most of the paint is gone (picture 3). Dab the paper towel onto the paper (picture 4). Don't press too hard because you aren't trying to color the whole paper, just show up the details. Repeat until the door has gold highlights all over (picture 5). Use your miter cutters to cut the trim pieces and attach with glue (picture 6). I measured and glued as I went to prevent mistakes.

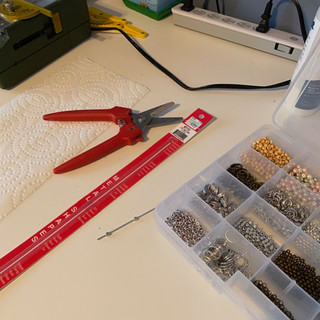


Step 3: Make a handle for the door
There are lots of options here, most of which can be found in the jewelry section of a craft store. For the handle for the modern diagonal, I used brass tubing (you can find it in the model section of a craft store) and 2 jewelry beads. For the metal tile door, I used a jewelry bead (I cut off the loop with wire cutters). If needed., spray paint the handle. Because you're working with metal, use super glue to attach the handles.

Step 4: Make the mounting hardware
Now it's time to get the door mounted. Just a reminder that the measurements might be different based on your doorway and door, but the principle is the same.
Materials:
-(1) 1/8" x 1/4" cut at 7" (track)
-(2) 1/8" x 1/4" cut at 1/4" (spacers that are mounted to the wall)
-(2) grommets or (4) eyelets (more on this in a bit)
-(2) 1/8" round dowels cut at 1/4" (these get inserted inside the grommets/eyelets)
-(2) 1/16" x 1/8" cut at 1 1/4" (these are the bars that attach the door to the grommets/eyelets)

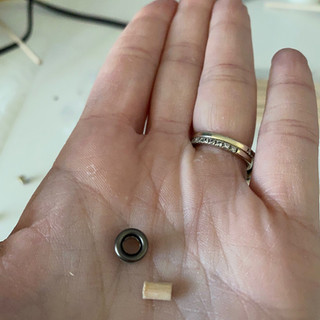


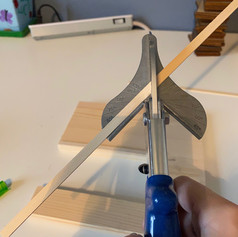
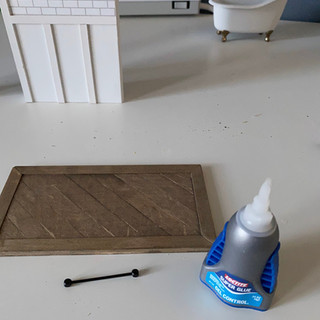
To make the track, cut your wood a little longer than the combined width of the doorway and open door. Glue spacers to the back so the track comes off the wall a bit (picture 4). Use tiny grommets or eyelets (fit 2 together so that it can fit on the track (these won't really roll but it helps the door stay on track so you can slide it). Insert your round dowel inside the eyelets to ensure it fits (pictures 1 &2). Glue the round dowel to the bars that will attach to the doors (picture 4). Spray paint your hardware (picture 5). To attach the door hardware, lay the track above your door to check on the spacing and glue the bars to the door (picture 6). Attach the track to the wall where the doorway is. I didn't get a picture of this, but I used the door to make sure the track was high enough that the door had a little bit of separation from the floor, and I used a level to make sure the track was, well, level.

Now, you have a sliding door in your dollhouse that is actually functional. This is such a fun and unique touch. Keep in mind that the mounting hardware is small and delicate so this is probably not the best feature in a dollhouse for tiny hands. My kids love pushing the door open and closed, but I make sure they know that they have to be super gentle.